


How to duck bass in Logic Pro X tutorial
How to duck bass in Logic Pro X tutorial Ducking or dip the bass to the signal of another part of the track is a common mixing and production technique in music production.

HeavyOCity Mosaic Tape
HeavyOCity Mosaic Tape For Beat Making? Can Heavy O City Mosaic tape be used for beat making? Mosaic Tape is a sample collection for Kontakt 6 and Kontakt Player, the idea being its a series of sound saturated an manipulated with tape. While aimed at the cinematic soundscape vibe when i heard the sound I knew it would work in other content. I was not wrong.
How to make a volume automation clip in fl studio 20
How to make a volume automation clip in fl studio 20 for audio and midi, Yes annoyingly due to how FL studio works we have to do these two thing differently. Now you can assign them to the mixer and automate the faders. I dont do this because it tend to cause an absolute mess when you want to adjust a mix just slightly down the line. Instead il show you the way il adjust volume for instruments and midi as well as the easy one which is audio.

Why I use squarespace for my small business
benefits they give me as a small business owner online. If you are going to create a website for small business that needs access to, Simple payments, Easy ecommerce and has a 99% up time. Try building out for first site on squarespace with the free 14 day trial. There's a guide above to get you started with a simple lead magnet page.

Pie Compressor Waves - My little secret drum bus compression plugin
Developed in association with legendary producer/engineer Eddie Kramer, the PIE Compressor was precision-modeled on a vintage Pye compressor like the ones he used in historic sessions at London’s acclaimed Olympic Studios. A mainstay in esteemed British studios throughout the classic rock era, the original Pye processors are considered by many to be among of the best buss compressors of all time. The Waves PIE plugin features a meticulously modeled VU meter with superfast refresh rates that recreates the accuracy, sensitivity, and ballistic behavior of a physical analog meter.

Have you tried music marketing with stories videos?
In this video we look at some of the ways you can use vertical video and instagram stories style videos you quickly an effectively create new fans for your music.
why cant i hear anything on FL Studio 20
why cant i hear anything on FL Studio 20 you cry! I get it. Here are the main things that happen in FL studio that lead to you not having an sound.

left and right eq or midside eq tutorial and explanation
left and right eq or midside eq tutorial and explanation Outside of our regular EQ which is amplitude changes at frequency point, We have the stereo spectrum. And in this video we explore left and right eq and midside eq, The differences between the two methods and the benefits of using them on certain types of material.

Izotope Neoverb - Now we have smart Reverbs?
From the minds behind Ozone and Nectar, and powered by legendary Exponential Audio technology, iZotope Neoverb is the most intelligent reverb plug-in for music producers. Save time and leave the trial and error behind and design unique spaces for vocals and instruments in seconds, without muddying the mix.

Thumping 808 bass Xfer Serum tutorial
Thumping 808 bass Xfer Serum tutorial. In this video we will build a 808 bass in serum. This 808 style sub note slides and feels huge. Its quite simple to make but requires knowing your way around Serum's voicing and effects. Let make this thump!
Mix Kick and Bass FL Studio 20
In this video Kick and Bass FL Studio 20, We address one of the most common mixing issues people face, especially when working with drum loops. Side chain the kick to the bass is simply in most situations but with a drum loop we have to be a little more careful. there is however a little hint in FL Limiter that shows you where your kick is hitting and you can simply dial into it. This is a simple way to sidechain the kick to the bass in FL Studio 20 with FL limiter.

Dynamic EQ explained How to use dynamic EQ
Why use Dynamic EQ - Dynamic EQ explained How to use dynamic EQ. Simply put, dynamic EQ changes the gain of an EQ band dynamically, depending on the level of the input signal. This makes it possible to perform subtle and surgical edits similar to a multi-band compressor, but in a way that's often more intuitive and easier to work with. Its like multiband compression but with the flexibility of an EQ, the trade off is usually the dynamic speed is slower or less flexible due to artifacts that would occur when altering audio amplitude in this way, This can be noted in both Fabfilter ProQ3 and Neutron3 from Izotope

how does xfer serum work - Serum GUI explained
how does xfer serum work - Serum GUI explained Xfer serum tutorial is taken from the following course - https://www.udemy.com/course/xfer-serum-course/?couponCode=B5DDBF6EEBF92EF98E69 This video explains how does xfer serum work and is a tutorial for the gui and workflow for the serum synth.

Remove vocals from song - Izotope RX8 Quick Tips
Remove vocals from song - Izotope RX8 Quick Tips In this quick tip il show you how to remove the vocal from a song, Giving you the instrumental for thing like busking, rehearsals and learning covers. The vocal removal tool can be used for a number of different applications. But the theory remains entirely the same as here. Enjoy.

Best low budget microphone for youtube beginners
Best low budget microphone for youtube beginners, In this video we look at the new cheap microphone set up from tonor that's perfect for beginners starting youtube, podcasting or live streaming.
We compare it with a mic around 4x the price to see how it fairs, All in all its a fantastic cheap mic for youtube if not one of the best options out there.
Monark Synth tutorial - Warm Reese Bass
Monark Synth tutorial for making the warm reese basses I use in many of my tracks. The tutorial shows How I make the overall sound concept, which is actually super simple. Then covers some of the routing in Monark to make the bassline wobble, Key tracking allows us to get the traditional reese wobble that follows the tempo. Using 2 simple automations we can make the bass move in an out of timing with the track but in a very progressive and natural way. So that it always feel quite analog. Enjoy making your nice warm reeses.
Xfer Serum LFO explained
This tutorial should leave the xfer serum LFO explained for you, And hopefully open up your mind to some of the ridiculous flexibility it offers when making patches. To see an example of the FLO being used in multiple ways in 1 patch

Where to boost and cut EQ
Q that doesn't show you any visuals like an SSL emulation. In this example we are use eq on vocals but this works with just about anything.

Logic Pro 10.5 Step Sequencer Tutorial
Logic Pro X 10.5 added a FL Studio style step sequencer, Except its way better in every way. In this Logic Pro tutorial I will show how to use the step sequencer in logic pro, We will use the quick sampler to make a drum program in about 15 seconds using a sampled loop and then use the step sequencer to make the new instrument we made into beats all before 2 mins are up. from there on out it's all gucci extra features to make sequencing beats even easier. check out this trick to get the step sequencer to groove with a live beat off the grid - https://youtu.be/nHaFKyokVT8
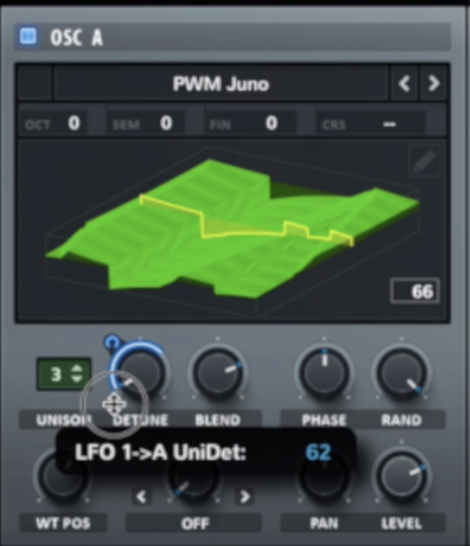
Xfer Serum Tutorial DnB Roller Bass
In this tutorial were going to make some drum and bass serum presets for roller style basses.
Starting off go to the init preset for Xfer Serum, Its just the default sawwave.
For the tutorial were using the PWM Juno wavetable. Id suggest follow along and make the patch and then tryout new wavetables and routing ideas from there.